M.2 for external gpu
This post was created with help from AI. It is intended for inspiration only and not as a comprehensive guide. Do your own research!
The motherboard you have might be enough
I wanted to add external GPU capability to my system and discovered something interesting: my M.2 slot provides PCIe 3.0 x4 bandwidth, while most motherboard expansion slots only offer x1. That’s four times the bandwidth from what initially seemed like an unconventional approach.

If you would like to do this yourself, you will want to verify whether your motherboard’s M.2 slot supports PCIe. You’ll also want to determine how many PCIe lanes are supported.
Hardware
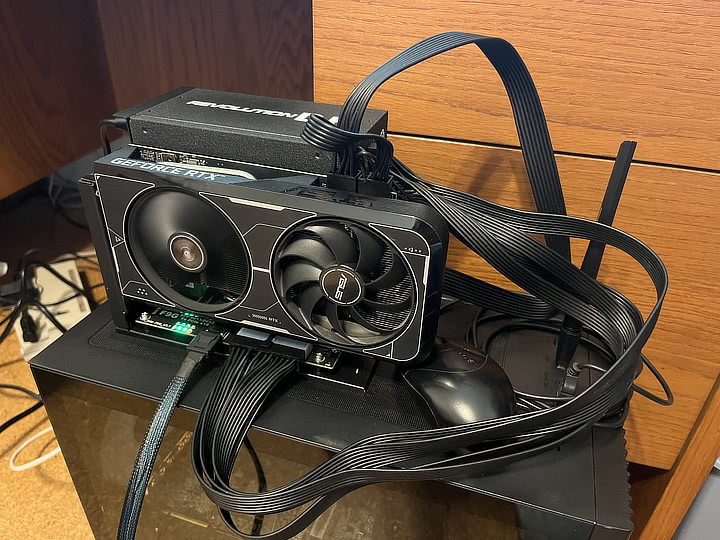
- F9G-BK7 EGPU OCuLink GPU Dock PCIe4.0 X4 The dock that holds the GPU. I chose the F9G series for its reliability. ADT-link also makes similar products.
- ONE XPLAYER OCuLink Cable I went with a quality cable for better shielding and PCIe 4.0 support over longer distances.
- chenyang Oculink SFF-8612 to PCI-E 4.0 NVME M.2 M-Key Host Adapter Converts the M.2 slot to oculink. Works with standard M.2 sizes (2230/2242/2260/2280). The Amazon reviews weren’t encouraging, but it functioned correctly in my setup.
- Separate power supply for the external GPU, since the connection doesn’t carry power.
The adapters and cables cost about $100 excluding taxes, shipping, the PSU, and GPU.

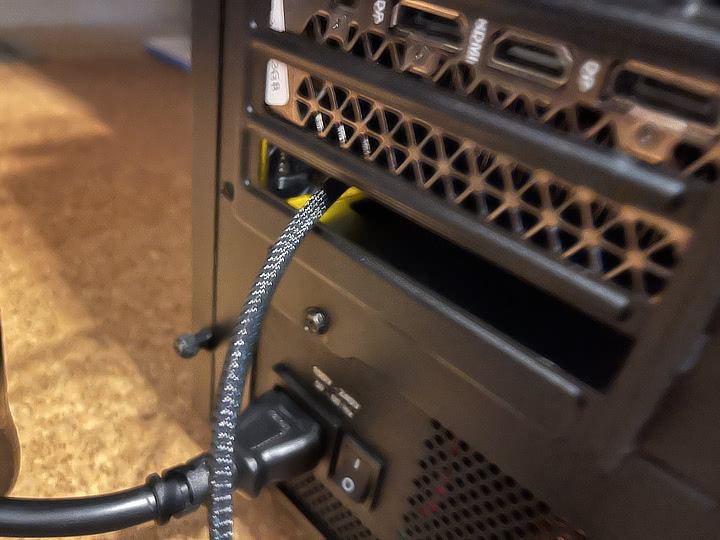
The oculink cable exits through the back of the case since I ran it without a proper mounting plate.
BIOS
Initial boot resulted in a black screen – the system detected the external GPU but couldn’t boot with it. I made these BIOS changes:
- Enabled CSM (Compatibility Support Module) for legacy boot support
- Disabled Secure Boot by clearing platform keys (can be restored later)
- Enabled “Above 4G Decoding” for modern GPU support
- Disabled ASPM (Active State Power Management) for the CPU PCIe controller
- Disabled CPU PCIe ASPM Mode Control for stability
- Disabled SR-IOV Support to avoid conflicts
- Set M.2 Link Mode to Gen 3
Oculink doesn’t support hot-plugging like Thunderbolt, so I power the eGPU dock first, then boot the computer with everything connected.
Multi-GPU AI performance
With both GPUs visible to the system, I tested AI workloads. Both showed VRAM usage when loading models, but only one processed during inference. The issue was tensor splitting configuration.
With llama-server, I experimented with different settings:
llama-server -m model.gguf -ngl 99 -sm row --tensor-split 0.5,0.5For models that fit on a single GPU, single-GPU performance often exceeds multi-GPU due to reduced communication overhead and simpler execution paths.
GPU assignment in Windows
Windows assigned the external GPU as GPU 0 and the internal GPU as GPU 1. Some games default to GPU 0, so I manually assigned applications to the preferred GPU when needed.
Since my motherboard lacks integrated graphics, I couldn’t easily change the GPU numbering. The eGPU gets detected first, likely because it connects through a CPU-direct PCIe lane via the M.2 slot.
Monitoring tools
Task Manager’s GPU monitoring showed minimal activity even while running llama-bench. I found nvidia-smi -l 1 more reliable for real-time monitoring.
# Single GPU testing set CUDA_VISIBLE_DEVICES=0 llama-bench -m model.gguf -ngl 99# Multi-GPU testing set CUDA_VISIBLE_DEVICES=0,1 llama-bench -m model.gguf -ngl 99 -sm row --tensor-split 0.5,0.5
Trade-offs
The BIOS changes carry some downsides. Disabling Secure Boot reduces protection against boot-level malware. Disabling ASPM increases power consumption. CSM adds boot time overhead.
The performance gains justified these compromises in my case. The M.2 to oculink connection provides nice bandwidth, allowing usage of multiple GPUs in systems that otherwise couldn’t.
This approach requires comfort with BIOS configuration and boot troubleshooting and isn’t for the faint of heart.